Funeral Program Photo Editing
One of the most imporant parts of a funeral program is your loved one's cover photo. Ideally, you should use a professional portrait photo with just your loved one in the picture, with a non-distracting background. However, sometimes it's difficult, to find a good photo to put on the cover of your funeral program or booklet. You may have to use a "less than perfect" photo or digital picture and do some minor photo editing and adjustments. This post gives some information and tips about quickly making adjustments and edits to your photo, so that your program looks beautiful and professional. For more information about selecting photos and scanning, see our article "Funeral Program Pictures and Photos".
Quick Adjustments in Microsoft Word (or Publisher) using Picture Tools
Microsoft Word and Publisher have photo editing tools that will allow you to quickly and easily make adjustments and edits to your pictures and photos with just a few clicks.
You can access "Picture Tools" by selecting a photo or picture, and clicking the "Picture Tools | Format" Tab located on the main menu bar at the top of the screen (picture tools may also be available on Word 2003 and 2007) Here are a some basic edits you can make.
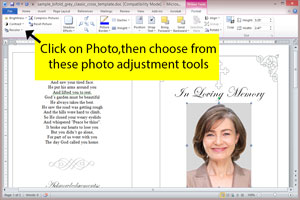
Basic Photo Adjustments
Picture Brightness -- If your picture is too dark, experiment with the brighness options of this tool.
Picture Contrast -- Adjusts the contrast of the picture.
Compress Picture -- This is a very useful feature that you may need to use. This option will compress (or make smaller) your photos and images. Using this feature can significantly decrease the size of your file. This may be useful if you have to e-mail your program, or if you printer is having problems printing a large funeral program booklet with a lot of pictures and photos. We recommend that you make a copy of your file BEFORE you compress, then, compress the copy. This way, if the smaller sized pictures don't print the way you want them to, you can go back to the original version.
Resizing and Cropping a Photo
You will probably use these options the most when manipulating photos in funeral programs.
Resizing your Photos -- You can quickly resize your photos by clicking on the photo to select it. Once selected, simply hover over the corner of the photo until the cursor turns to a double arrow. Click and drag to resize the photo to its desired size. By selecting the corner, you will maintain the proportions of the photo, so you photo wont be skewed or distorted.
Croping or "Triming" your Photos -- Cropping your photos allow you to cut you photos down. This may be necessary, especially if you are trying to "cut out or cut around" certain elements in your photo.
To Crop, select your photo and go to the "Picture Tools | Format" tab and select the "Crop" tool. When the tool is selected, you will see a black box aroung the photo. Simply click on the photo and drag to the desired size to removed the unwanted portions of the image.
The Crop and Resizing tools are very important when creating funeral program collages and inserting additional photos inside the funeral program. For more information, see our article on funeral program collages.
These tools will help you get started editing and correcting your photos in Microsoft Word or Publisher, so that you can have the perfect photo on you funeral program to remember your loved one.